Showing posts with label ideas. Show all posts

Monday, March 21, 2011

A week of Ideas Part 1.

So, how about some of those ideas I said I'd share last week?
Anyone curious?
I'll start off by saying, they are not ridiculously clever, but some small workings of my brain muscle to solve some humble conundrums in our new home, or just some things that inspired me. I'll post some of them over the course of the week, and you let me know what you think and jump in with the ideas and inspirations that have worked for you, yes?
Okay.

Let's start with the back hallway, shall we?


Sometimes contractors do funny things. They did this in the house we built a few years ago, and apparently they did it here in our new house too.
Perhaps the very same electrician, drywall and finishing electrician all worked on both houses and figured it would be a great idea to spread out and fill an otherwise useful wall with random switches, security systems, vent fan switches and even a couple dead plates lower down the wall....(we'll stick with one battle at a time though...)

I had some lovely ideas of what to do with this wall before I realized it was otherwise occupied and can't even be used for any shelves, hooks or anything heavy enough to need a drywall anchor. All  of which would've been very handy in a back hallway leading to the garage.

Instead I had lovely random switches that couldn't be covered up permanently because they all actually have a purpose and need to be used from time to time. (like the thermostat in the middle of winter...ya,  I'd say we need access to that one)

Then Al suggested one day, that I use shadow boxes that could rest OVER the offending appliance and could be lifted off and on whenever necessary.

Brilliant Al, (you should see what she did with some plywood she found in her garage...)

Here are three of the frames I picked up at good ol' Ikea cause they had the deepest boxes that were just the right shape and size. (not to mention the right price)


Also, these "Ribba" frames allow you to place your artwork and matting in the foreground of the frame and then place the shadow frame inside after , basically creating a hollow box. I left the fiberboard backing and hanging hardware off, but used the positioning tabs to hold the shadow frame in place and then guess what? , I just HUNG IT ON MY WALL RIGHT OVER ALL THE GADGETS.


Heck yes, it was that easy and now it all looks beautiful.


They are this simple to pull of the wall when the gadgets are needed because the frames are sturdy and lightweight and none of the gadgets require the use of both hands to operate.
( I suppose the only way I could improve this would be to somehow hinge them to the wall, so that they opened like little doors, but like I said, I'd have to be very careful drilling anything into this wall because of all the electrical wiring stretched all over it behind the drywall.)

Two of my favorite prints by Ezra Jack Keats. (love love love his illustrations)


This has become a great spot for displaying my little artist's latest works. ( although this one of this little lady is now a little old, but gosh! I like her too much to swap her out. I think it's her bewitching eyes)

The whole thing is  pretty, it's practical and it cost practically nothing... I'd say that's a pretty good idea!

What do you think?

Tuesday, February 1, 2011

Clothespin Doll Tutorial.

Let's just get this out of the way; My photos are totally subpar...I am NOT a photographer by any stretch, but these feel especially bad. So I hope you can follow along, if you have any questions leave them in the comments below or email me!
There are several tutorials out there I'm sure on how to make these little dolls, so I"m not purporting that this is THE WAY to do it, but I've been tweaking it now for a while and like the results to here's my version of a clothespin doll. Ready?
Let's go!

Embroider floss (for the hair, top and knickers of the doll. Choose whatever colors you wish but make sure you have at least 3 feet for the top and knickers and enough hair that your doll won't be bald(ing).

At least one wooden clothespin ( I found these at Micheals)

Fabric Scraps ( at least enough to cut a rectangle 3.5 " X 2 ")

A hot glue gun.

Regular scissors for snipping threads

Pinking Shears  for cutting fabric (no sewing...yay!)


Right off the bat, cut some strands of floss for hair for your doll. Try to make them roughly the same length and choose how long you want her hair to be. ( I use no less than 2")

Next you will place a small bead of glue at the top of the clothespin above where the face will be in a thin line.
This is where you will start applying the hair.


Unless you want your dolly to have wild bangs, I suggest you place the hair on sideways to the face and continue to glue with the gun and simultaneously press the hair on with your fingertips until the hair now surrounds the crown of the dolls head and hangs down in a tail at the back of the head.
 like the photo below:


Tie a little bow around the hair if you wish, or you can get fancy and braid it etc.


The front of the doll should have her face free.


Now you will measure out the floss for her top and knickers.
Let's do the knickers first.
You will measure out about 2 feet of the floss for the knickers and about 1 foot for the top.


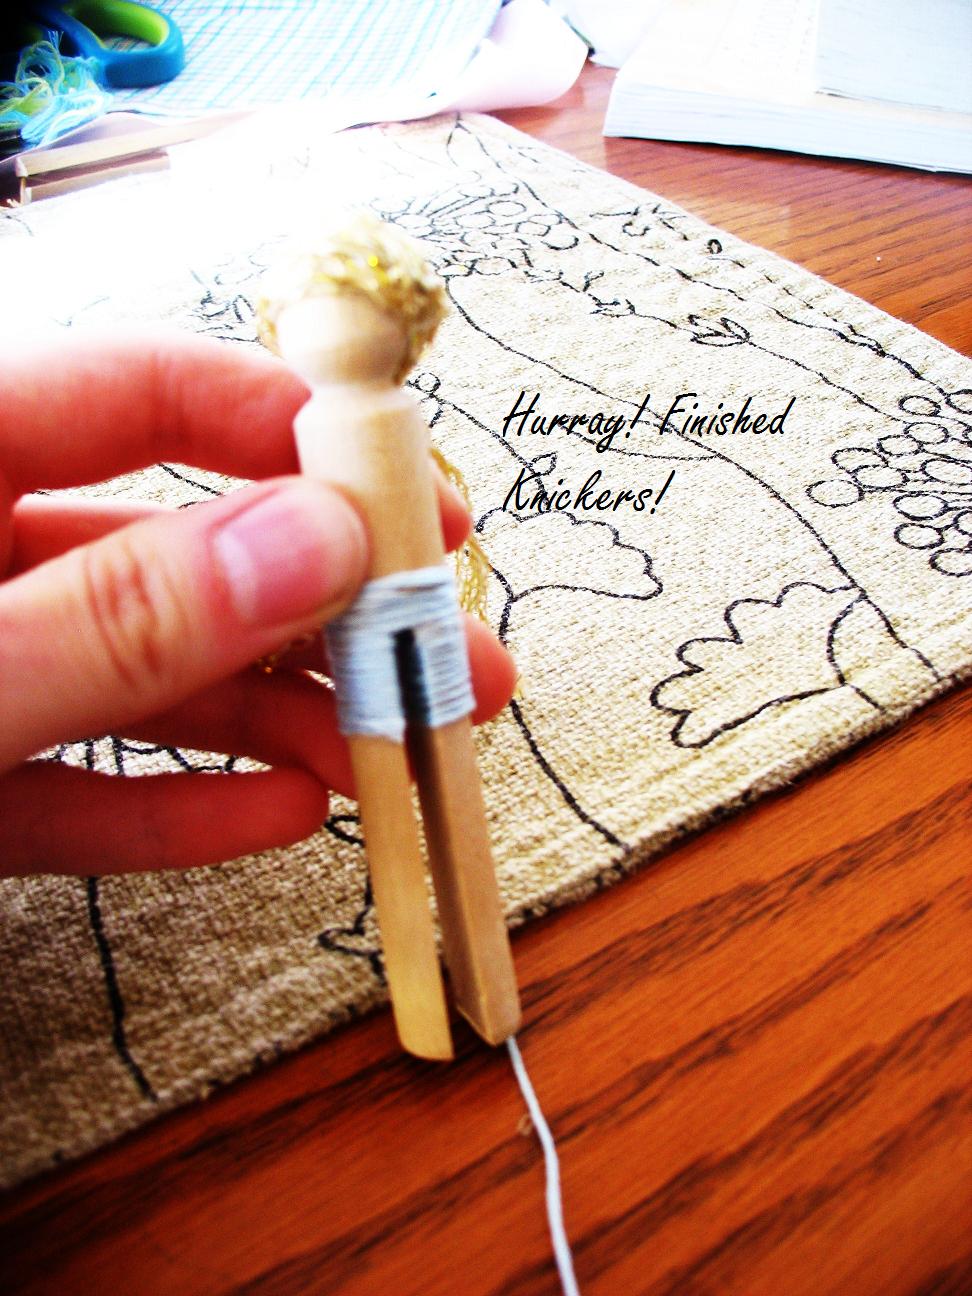
Place a small thin bead of glue along the waistline of the doll. This is where you will adhere the floss for the knickers and begin winding the floss around the body of the doll traveling down the body as shown below:


Now we have reached an impasse, and must choose which leg to continue down. Choose a leg and wind the floss around and between the dolls legs as shown below:

When you have the knickers to the desired length make a small spot of glue on the inside corner of the back of the leg you have been winding on. Snip your floss and press the free end of the floss into the dot of glue to secure it.
Still using the glue gun, make a dot at the top inside corner of the opposite leg that has not been wound and begin your floss again here so that you can wind it around this leg to match the first leg you wound. Finish it off the same way.


You should have little knickers that look something like the photo above. Yes? GOOD!
Now let's move on to her dress:

Measure and cut a small rectangle using pinking shears in rougly the dimensions shown below:


Once you have cut your fabric fold it in half and cut a quarter crescent shape from the rough edge to the folded edge as shown below:


This will help the little dolls dress to flare out when we attach it to her.


Back to the glue gun we go! Place a small thin bead at the waistline of the doll once again just above the knickers. This is where we will begin attaching the skirt.
It is important to note before beginning to attach the skirt. We will be attaching the skirt with the top of the skirt folded under itself. As you attach the skirt you will keep it folded over and make small pinches with your fingertips as you go to create pleats. You will have to work quickly before your glue dries or go bit by bit back and forth from the skirt to the glue gun. It's a little tricky, but I know you can do it!


Here's how we first attach the skirt with the right side facing into the glue.
then we fold it over as seen below:


Here are the pinches that create the gathers in her skirt.


Tired yet? We're in the home stretch, and she looks fabulous!


To fix the raw edges at the back of the skirt double fold the raw edges in and glue them down at the waist line. Place a small dot or two of glue on one side of the unfinished skirt and press the other down on to it to create a closed seam. ( the two folded raw edges should now be folded into each other)


To create the top of the dress. We will place one more thin bead of glue along the waistline just above the skirt and adhere the edge of the one foot piece of floss. Wind the floss around the body of the doll until it is finished or until you are satisfied with the width of the top on the doll. Place a small dot of glue at the back of the doll, snip your floss and press the edge of the floss into the dot of glue.
Guess what?
You're done!

Congrats, she's gorgeous!!!!

Monday, December 13, 2010

Adventures In Art; FINALLY!

Ages ago, I promised to put up some pictures of the art show my students had a few weeks ago, and I'm only getting around to it now.

On November 30th I held the Adventures in Art Fall Show for the 9 students I had been teaching since September.  I taught two different classes of girls; Ages 7-11 and ages 4-6.


                                                            (myself and some of the students)


An excerpt from the program at the show:

"The two classes in the fall semester covered the basic principles of art and focused very heavily on rendering skills. All of the works in tonight's show were drawn free-hand by the students with as little assistance with mediums as possible.
We studied different methods of observing and drawing in both classes and worked in pencil, marker, chalk and oil pastels, acrylic paints and paints.
The students worked very hard on all these projects and were a great pleasure to have in the class. 
Most of all we just had a really great time!
As you will see, we were all inspired by animals this semester and had a lot of fun bringing them to life with color and creative compositions. We hope you are inspired by the works of tonight's show and that they spark the creativity that lies within each of us. 
Thank you and enjoy, 
Ashley Winkel and fellow artists."


Camels in negative space with oil pastel by the ages 4-6 class:

                                           
Tropical Birds by the Ages 7-11 class: 


Octopus in Chalk Pastel by the ages 4-6 class:


Animal Portraits by the Ages 7-11 class
(L-R: African Elephant, Spanish Dancer, Hummingbird, Girraffe, Polar Bears, Siberian Tiger)

                   
Tropical Birds by the ages 4-6 class:


Sea Life Portraits in Chalk Pastel by the ages 7-11 class:

                                                           "Dancing Jellyfish" by B.S. (age 11)

                                                     " White Ocean Whale" by R.R. (age 7)

                                           "Clownfish in the Coral Reef" by O.S. (age 9)

                                                      "A Starred Beach" by J.S. (age 7)

                                                     "Grump" by A. R. (age 8)


 A selection of portraits in Acrylic up close:

                                                                  "Lost" by B. S. (age 11.)

                                        "Pink Flower and Humming Bird" by R.R.(age 7)

                                                            "Stripey" by J.R. (age 7)

                                                              "Mad for Stripes" By O.S. (age 9)

Impressionist Monkeys in Acrylic by the ages 4-6 class:


IThis is just a sampling of the great pieces the kids did. I was crazy proud of them, their parents were crazy proud of them and they were crazy proud of themselves! Art is always a good thing: for every age, every community, even when it's a little group of students who gathered around my kitchen table and their family and friends who gathered in my (crowded) basement to look and discuss and just be in the presence of art.

Such a good thing.


(If interested in more information regarding the art classes I teach, I will try to update my "Adventures" in Art" info page on Facebook or you can email me directly at my email address, or leave a comment so I can get back to you, thanks!)

Thursday, December 9, 2010

Admittedly not my best work....

If you were to ask me what my favorite materials are to "upcycle" I would instantly say SOCKS!!!!!!

I have found some pretty nifty ways to re-use socks, and I will share them with you.

I promise.

A close second would have to be pillowcases.
A pillowcase is a many faceted thing:
A bag for hordes of candy,
A sleeping bag for a doll or teddy bear
A sack for hopping across the yard or sliding down a flight of stairs
A weapon when filled with bricks ( just kidding) :)
Wrapping paper for Easter Baskets.
Dresses, shirts, and paint smocks.

and now, a little apron for my baking apprentice


I didn't get any step by step pictures of this project as I made it, mostly because I pulled it together on our Esau Sibling Christmas weekend while the pack of them were playing cards at the table at about midnight.

But I will try to explain the process as well as I can and offer some explanations for the random things on the apron beyond just that I had a house full of lovely distractions and it was... about midnight.

I laid the cloth flat with the hemmed (open) edge at the bottom.
I  folded the left and right top corners in evenly to create the tapered shape of the apron but noted that I should have measured my child first to see how these big  corners should be folded to.

I used liquid stitch to press the corners down onto the rest of the fabric because, well I had to get this sucker done for the next day.

Then I took some old curtain ties that have been sitting in my scrap basket for ages and ages and used them to create ties on either side of the apron about halfway down from where those upper corners were folded.


Again I should have measured all of this, cause the apron will probably fit her great in another year or two, but it's a bit big right now.

I flipped the apron over so those glued down corners were now on the table and facing me was a lovely little apron shape with two waist ties but no neck.

I took another curtain tie and sewed it onto the neck but had to go back and make it adjustable with buttons this adjustable to change the fit as Ava Grace grows.

I then realized that I had sewn the neck piece on a little low on the other side of the fabric so that the bib of the apron gaped forward a bit... so I added these little ribbon ties to hold it all together and cause, well gosh, it looks cute.
A little random sure... but cute.

She loves the apron and I will improve it's design over time. (probably around the first time that liquid stitch comes unglued in the washing machine and I'm forced to do it properly  :)

Ah, but we upcycled something and that always feels good. There is no where but "up" to go, no?


cheers.

LinkWithin

Related Posts Plugin for WordPress, Blogger...