Showing posts with label creativity. Show all posts

Tuesday, June 28, 2011

The Sewing Space Revealed


Sometimes you just need to know when to cut your losses.

I felt for some time that such was the case with my basement set-up for my sewing machine. I hadn't been sewing for very long but already I felt that with the lack of light and inspiration around me I was a bit like Rumpelstiltskin...(maybe not with the spinning gold part but definitely with the hunched over in the cold dank surroundings part).

Okay, okay, my basement wasn't THAT bad, but I was beginning to avoid all the mending and projects that I had to do because I just didn't want to be down there. For starters, it was cold had poor lighting and the fact that I had a fantastic set up of tables and cupboards, my kids didn't want to be down there while I was down there... and I didn't really want them down there either. There's unpacked boxes and bits of furniture, extension cords and all kinds of other mischief to get into. Actually most of the time they just pull stuff apart down there and dig through their old baby clothes and toys. One day they actually sat and chewed on their old teething toys....even though they've been washed it was just odd....

So I made the decision that if the kids didn't want to be where I was... I wanted to be where they are.
Some of you, I know, find great success in crafting while your little ones are asleep or otherwise away, but that doesn't happen often enough for me to ever get anything done, so it works for me to sew away happily while they sometimes literally sit on my lap and play with my hair... distracting? Yes, but even though my seams aren't perfect... happiness reigns for all of us.

So first some furniture had to be kicked out of the playroom, some arrangements had to be adjusted and some stuff just needed to be plain thrown out... but it felt good like a purge always does and I was forced to weed through all the fabrics and half finished projects that I've collected in the last few months.

Then mama moved in....


and we set about to all the organizing... along with my little helpers of course. 

First with all the buttons.....


Then with all the yarn...

Finally it all started to come together and what felt like a basement repository of endless projects I would probably never actually do... suddenly I had this concise inventory of things that inspired me, were accessible and begging to be done for the sheer joy of it.


I spent a few days tweaking things and finding new homes for all the little bits that come with this new hobby and it started to feel like a personal space I just wanted to be in. I weeded through everything that didn't fit in the new studio and found clever ways to make my new addition to the playroom still feel light and playful in the room.

I fashioned this pin cushion for myself out of a sugar jar my grandma gave me. It's stuffed with fabric scraps and a little wool and just covered in a fabric scrap all stuffed in the jar. It makes me so happy every time I look at it.

All the buttons and elastics; more organized than they ever have been before...and I think only two got eaten in the process...and those were eaten by the cat.

All my vintage fabrics waiting for me to play with them!


This table from my mother in law really completed the space. The former table worked in the basement fine, but it rattled quite a bit when the machine really got going and with the outlet situation upstairs I had a hard time plugging in my machine and still managing to reach the peddle. So thank you Jan!!! And the little skirt I put on hides all those cords and rulers and cutting mats and random papers. I love it.... and I made it from a thrifted bed sheet :)


I have big plans for that little elf that belonged to my mum when she was a little girl but for now I just like that he keeps watch over my little drawers of notions for me. (Don't worry everythng sensitive and dangerous is kept out of reach up on those bookshelf shelves and even this jar of scissors and pin cushion reside up there when I'm not in the room) But these little drawers contain my marking pens, bobbins and measuring tape etc.

The gift card organize contains all my patterns in envelopes and the little drawer on the bottom of that is full of safety pins paper clips and what not... love.


This little cupboard contains all my stamps, cardstock and scrapbooking supplies for making cards and gift tags ( I know... I pack light when it comes to scrapbooking but I only buy what I need for projects, one project at a time so that really cuts down on the stash)


Lastly the thing that makes this studio so great is that I have found a way to share it with my kids. Making time to be creative in our house means including them... even on the solo projects.
The light and airiness of the playroom makes it a great studio, but even better is the ability to be doing something for me, for them... with them.

Yes, cutting your losses sometimes gives you the biggest gains, doesn't it?

have a great day!

Thursday, June 16, 2011

Parade of Projects Part 4 : Pajamas From Pillowcases (and enough alliterations to make your head spin)

Sometimes a good thing bears repeating... Pillowcases are good things and it bears repeating that they are one of my favorite things to "upcycle". I've made various items out of pillowcases now at this point; aprons, re-usable shopping bags, and dresses... but pajamas?

Oh yes,.... pajamas.

Bear with me as this may prove to be a long and rather laborious tutorial. Sadly as I went back over the photos I took while undertaking this project, I had to shake my head at how dim they really are. (On the flip side it made me feel a renewed surge of joy at the thought of sharing the new sewing space with you tomorrow). Also, it's been a few weeks now since I took these photos and in my usual "scatterbrain-edness" I couldn't be entirely sure as to the proper order or even original purpose of each shot. I won't delude myself that writing tutorials is my strong suit... far from it. 
In fact it has been an act of perseverance to post each and every one this week.  

Making things?- love it. Writing about how I did it? Not so much... in some ways it feels like a magician revealing secrets... but these are no secrets and I am truly no magician.

I am just a woman who loves to cut up pillowcases.


I found this set of very soft, Egyptian cotton pillowcases (you guessed it- I thrifted it... are you tired of hearing that is where I find almost everything? Cause I know it still give me a thrill... but I think at this point.. if I have it, you can assume I probably found it there.)
Anyway, this was  a particularly nice set of pillowcases and I wanted to save them for a particularly nice project, so I started with the first pillowcase and used the same leggins pattern from Part 2 of the Parade of Projects to trace out pieces from the first pillowcase for the pants.

I made a few modifications. Obviously I didn't want to make my daughter a pair of pillowcase leggings, I wanted them straight-legged pants and so I traced the pattern adding wider, straighter legs as I cut:


I almost forgot to mention, I made these to fit a size four child and I followed both the guidelines on the pattern (which was designed for sizes 2-4) and by measuring my little girl first.


I think this is just supposed to be a close-up shot of where I deviated from the pattern.


Here is what the cut pieces for the pants looked like: there were two of them obviously.
I sewed up the leg seams  and then used the trick of inserting one pant leg inside out into the other pant leg inside out so that the right sides are together and the crotch seams are lined up. I pinned it all in place and sewed up the crotch seams. (note that I didn't have to hem the pants because I used the original hem of the pillowcase)

I made a casing for the waist about 1.5 inches wide and inserted  a piece of elastic I had measured to my daughter's waist. I stitched everything shut and voila! The pants were done.

But for the top, I had far grander plans. Plans that included designing a shirt from scratch by creating my own pattern...

I started with this shirt of her's that already fit. (in retrospect I wouldn't have followed the shirt as closely as I did. As it stands, the finished product only just fits now, and there will be no longevity to it, whatsoever. A rookie mistake I'm sure, and one I won't make again....I hope)


I laid the shirt on tissue paper to draw up my pattern pieces tracing the basic neckline, arm holes and length and width of the torso of the shirt.


Here's me tracing.

I did NOT trace the sleeves at this point but I'll get to those in a minute. After tracing out my patterns and measuring everything to make sure it was even, I cut it out and it looked like this:


 I duplicated it to make the back of the shirt and made a higher neckline for the back of the shirt.


I decided to make some changes to the overall finish of the shirt at this point, so I cropped these torso pieces a little and pinned them down to the wrong side of the fabric, ready to be cut out. Note that the back piece has been cut in two as well so that the shirt will button up along the back.


I cut my pieces, making sure to cut little notches out for all the curves of the arms and neckline, ironed down my seam allowances, hemmed the edges of the back of the shirt and top-stitched down the neckline.


There, see it all pretty and finished and the two torso pieces assembled? Now I was ready to mop my brow, take a swig of strong tea and get to the hardest part: ....sleeves.

Unfortunately, here are where all the photos of  complicated process of the creation of the sleeves should be. I have no idea how they made their way off of my memory card or computer but to break it down in instructions...well, I'll give it a go.

I measuring the entire circumference of the arm hole and drew a straight line on paper in that exact measurement. Then I drew another line parallel to it and directly below it about 4 inches lower. Then I created a curve traveling from one end of the line up to a point above the very middle of the line about 4 inches as well and dropping back down all the way to the opposite end of the line.
whew... I know I warned you....but that even made my brain hurt.

Anyway, I made a curved sleeve shape that fit the armhole, cut it with a one inch seam allowance, pinned the whole thing together, said a prayer ( I may have even crossed myself) and sewed that sleeve onto that shirt. 

You know what? It worked.
That little pajama shirt now had sleeves.


Now, here's how I finished the rest of the shirt.
I cut a long rectangle, 4 times the length of those shirt pattern pieces I had cut. I hemmed the bottom of it and I gathered the top of it, and I attached it to the bottom of the torso piece. I gritted my teeth once more, practiced several button holes on scrap fabric and finally got brave enough to put a button and button hole on the back of the shirt and there.... it was done.

When the dust settled and my hands stopped shaking, I sat back and watched my little girl early the next morning, cuddling and reading on the couch in her new polka dot jammies.


She loves them.


and I absolutely love them.


I think they are my favorite thing I've ever made with a pair of pillowcases to date.


Cheers... and thanks for your patience...I promise you, you won't be put through that again. ;)

Wednesday, June 15, 2011

Parade of Projects Part 3: A Sweater for a Gentleman

As I mentioned in my Yarn Along post from earlier this morning; sometimes it can be tricky to come up with projects suitable for all the Little Men we have. It seems to me that for our sons, grandsons etc. there is more mending to be done than anything of a truly creative nature. I have seen some very nice sewing patterns and tutorials for boys out there, and perhaps it would be beneficial to gather them all here in a post for I sometimes consider to make a mission for myself to break out of all things gathered and sweet and sew something for my little gentleman to wear.....(gentleman? who am I kidding? He spends most of his days happily wandering around the house in a diaper, pajama shirt, rubber boots, upside down sunglasses and a fanny pak... I kid you not.---see what I mean, the kid needs clothes.)


So I set out to turn a half cut up sweater of mine, into something dapper for my little fellow to wear... and here's how I managed it...


I laid said sweater out flat and cut off the neckline first. Followed by the bottom 9 inches of the sleeves and the bottom half of the body of the sweater.

Here is what I was left with:

I cut about 4 inches out of the side of the neckline and then pinned it to the top of the body piece that I had cut. I used a marking pen to mark the outline of the neck and to find where my shoulder seams would be.


Then it was time to figure out where my arm holes would be. To do this, I first cut both the arm pieces that I had at the tops at a roughly 45 degree angle and measured that line. I laid it along the body of the sweater I was building, where my sleeves would go, and traced out a curved line that matched in inches with the opening of the shoulder of the sleeve. I made each side identical.


Then I cut the sleeve openings. ... at this point I considered turning it into a vest, but I really wanted to see how this whole sleeve experiment would work out, so I forged ahead.


It appears, I am missing one of the important photos that shows the attachment of the sleeves to the arm holes. First I serged the shoulder seams and then flipped the "sweater" inside out. I flipped the sleeves inside out as well and placing right sides and seams together, I pinned all the way around the arm hole and used a stretch serge stitch to sew all the way around.

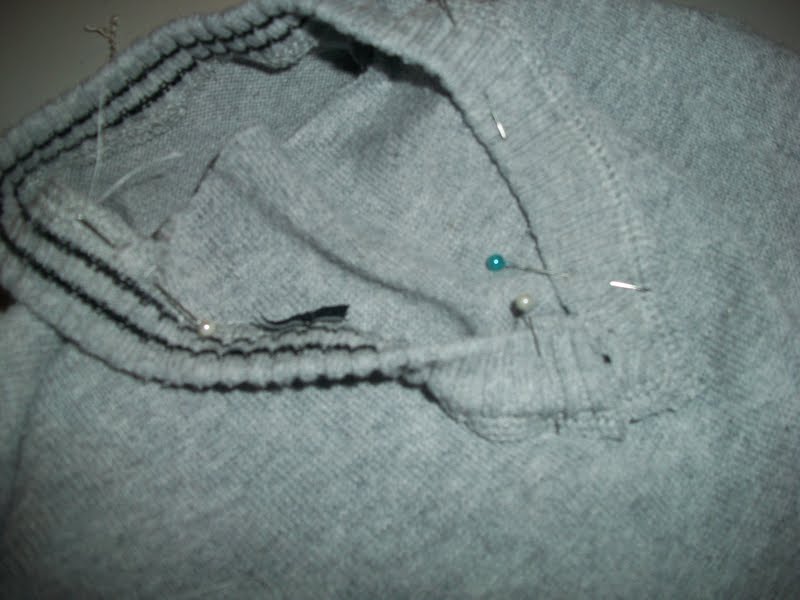
Now, we'll move on to the neckline. I took the neckline off and began to pin it down backwards to the front of the shirt because I did not want it top-stitched down, I wanted a hidden seam where the neckline attached to the body of the shirt.


Once I had it all pinned down I cut out the excess of the shirt and with the sweater inside out, attached the neckline with the same serge stitch I had used on the arms.

It looked like this:


NOTE:  on the photo above you can see where I connected the neckline to itself (where I had cut the four inch chunk out of the neckline)... I decided that I would put some sort of embellishment to hide this ugly seam.

below is a picture of the sweater all but completed, with the neckline attached, as well as the sleeves.


And here's the embellishment I mentioned above; three little wooden buttons added just the right amount of charm and hid that seam brilliantly.


And I would say, other than the dirty little face; my little gentleman cleans up rather well in it, no?


Here's to sewing for our boys!

****
Also, don't forget changes to the blog should be up and running tomorrow as it is the one year anniversary of the blog. Check here for a special post, a giveaway and of course a couple cool new things design wise. Bear with me if the transitions are a little groggy and remember that my email address is a(dash)winkel(at)hotmail(dot)com if you need to email me and ask what the heck is going on.


Tuesday, June 14, 2011

Parade of Projects Part 2. Leggings from a T-shirt.

On the first day of my first sewing class, the instructor had us all introduce ourselves by stating how long we've been sewing, what kind of machine we had and what we liked to sew.

I likened myself to a helpless infant in terms of my sewing experience, told them I had the machine my mother in law (who knows sewing) thought was a good idea and that I really wanted to be able to sew so that I could do a lot of "repurposing".

That got a squeal out of my jolly, plump instructor.

"Ooooo isn't that sweet! These modern girls these days with their new sewing ideas.. what did you say it was called dear? Repurpo....?"

Uh... re-purposing. It's when you take old things you don't use anymore and turn them into something new that you will use. Kind of like the the other three "R" (reduce, reuse recycle)." I smiled.

I think at that point she wanted to pat my head (and perhaps if I'm really honest, I wanted her to too.)
But she clapped her hands to her ample bosom and sighed,

"oooooh so sweet and modern, these girls these days"

I kept thinking to myself, "Modern?" I thought that was a pretty old-fashioned idea, borne out the generations before us who "repurposed" so many of their things simply because they had to. It wasn't trendy it was thrifty. And back then I guess thrifty was in.... very very in.

But I really do get caught up in the thrill of what I like to call "Upcycling". I love creating new things out of old things and putting my twist on them but I especially love when I can turn something formerly unnattractive into something cute and useful.
It makes me want to clap my hands to my not so ample bosom and give some "Ooooohs" of my own.


Here's how I "upcycled" or "repurposed" a grotey old T-shirt from my father in law into some leggings for Ava Grace.


I started with this free "Mining Expo" shirt from who knows when.... I think it came from some special even Opa had to attend as a manager in his days at Syncrude Oil.... Mining rescue Expo maybe... 1992???? I'm just guessing... and I digress....

I felt like telling the shirt not to worry. Help had in deed arrived.... in the form of my scissors...


I used this patter my mother in law gave me. ( I believe it is discontinued, sorry) I used the size 4 pattern and traced it onto the black T-shirt placed right side out.
NOTE: To hide the big blue logo on the back of the t-shirt I decided to make the right side of my leggings the wrong side of the T-shirt. So I traced it on the T-shirt lying right side out.

I cute out my two pieces from the pattern and sewed up the inside seam of the legs. I placed one leg inside the other (right sides together) and matched up the seams of the crotch and sewed those together with a serge stitch as well.


I flipped the top over by about 2 or 3 inches and pressed it down and then folded it under again at about 1.5 inches. to make a casing for elastic. I stitched this down with a small zig zag stitch and threaded a piece of elastic through the casing. I stitched my elastic closed and then closed the casing and left the leg cuffs unfinished with the hem from the original bottom of the T-shirt. It kind of looks edgy and cute.

Anyway, it looks a whole sight better than a giant retro Syncrude T-shirt... so "upcycled" it is!


Ooooohhh How sweet and modern is that?!

Monday, June 13, 2011

Parade of Projects Part 1. A Little Ruffled Shirt.

Just as I promised, here's the first post in a parade of children's sewing projects that I will be posting all week long!
A few housekeeping notes first....

A few changes may be making the blog a little wonky in the next little while.. bear with me and I'll keep you all updated as to what's going on so no one is left blinking in confusion in the shuffle. What will most likely be happening will be a move to a new domain name and when that site is complete, we will do one big move all at once and no one will get left behind... but like I said, I'll be keeping you all in the loop.

In other news... yes, there is a regular posting for this morning as well. You can scroll down past this tutorial and find it below

And keep watching for the giveaways starting on June 16th! There will be five give-aways starting on Thursday and Friday and breaking for the weekend to resume on Monday to Wednesday. (if that sounds confusing, don't worry.. I'll guide you through it.) Just some little tokens of my appreciation for all the lovely readers who bless me with their encouragement advice and patronage in this little head space.... yay, I'm excited.

But I'm also excited to start sharing some of the sewing projects... so without further ado, we'll start with the simple stuff... cause as a beginner sewer... that's where I start too...


Here's how to make a long- sleeved t-shirt into a short sleeved shirt with little girlie ruffles...


Oh and sorry for the poor photos... I'll be sharing my new sewing space with you all this week too and believe me when I say that climbing out of the dark basement was the best thing I ever could've done and my sewing and photos are now MUCH better for it... I think you will agree when we get there.

So, I started with this long sleeved -T that was getting a little short in the wrists for my lanky little girl. I took up a pair of scissors and.....

hacked them sleeves right off. Measuring of course so they were the same on either side. and still leaving 5 inches of sleeve on the shirt.

Then I cut three strips off the cut-off sleeves (they were little tubes and I cut them open to be strips) and serged along the edges of the strips so I will use them as ruffles on the front of the shirt.


I basted along the middle of each strip  and then pulled the basting to ruffle up the strip. (to do this, you hold the bottom thread and tug the top threads and the whole thing will gather up)


Then I evened all the strips so they were the same as the others and pinned them down to the front of the shirt. I used a small zig zag stitch to sew them down to the front of the shirt using my basting stitch as my guide and removing the pins as I went along.

My last step was to get a little fancy and add some dainty pearl buttons to the whole affair; about 3 per ruffle- evenly spaced.

And there you have it; a little ruffled t-shirt perfect for summer with a little vintage-esque flair.
For info on how to cap the sleeves check out the green dress tutorial found HERE or follow the other,  MUCH more talented Ashley from make it and love it.

Hope you get inspired to snip up some old winter clothes this summer; for I see no reason why this couldn't apply to your own closet too. ... hmmmm... maybe I should go hunt through that stack of long sleeves languishing on the shelves of my closet now that I think of it.....

Have a great week, see you tomorrow.

LinkWithin

Related Posts Plugin for WordPress, Blogger...